
Introduction
Over the years we have worked with many computer problems ranging between Mac & PC, Local & Server, and Cloud & Application problems. However, even though the specific solutions change from program to program (or hardware to hardware), the logic is the same. In this episode of Tech Support, I want to walk through how a problem is solved, so that clients can better understand why Tech Supports ask so many redundant questions or request you to do so many useless tasks. We strive to make Tech Support as simple and easy as possible, and part of that process is sharing how we do it so that our clients can become confident in reporting problems, and even braver in attempting to solve it themselves.
So how do you solve a problem with computer technology?
To explain the process, we are going to follow through an example of a very common and quite despised piece of technology… printers.
“HELP! My Printer isn’t working!!!!!!”
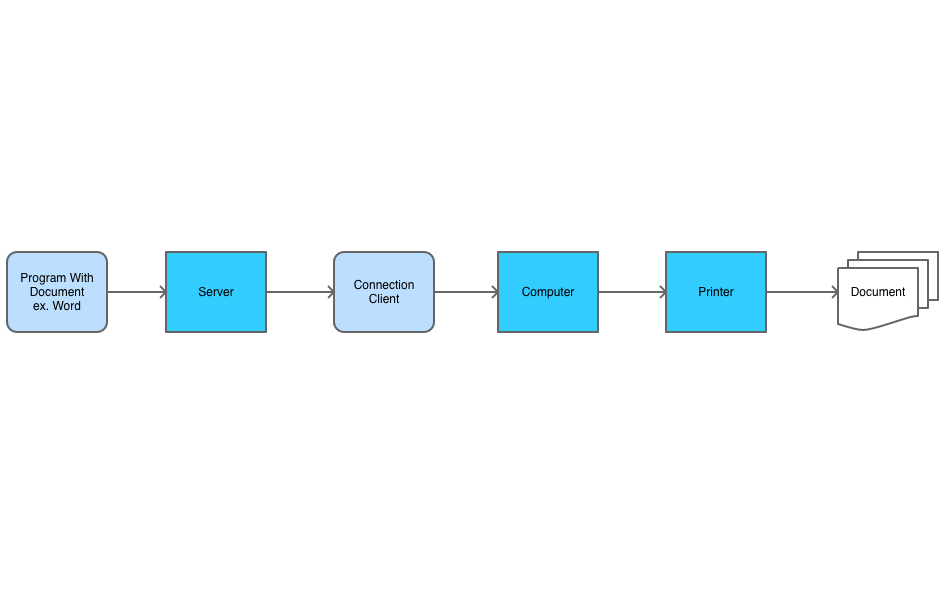
To explain this the best, here is the path of connections required to make a successful printer, going backwards from printer to program.
- First the Printer itself must be in working capacity: Power on, paper inserted, cartridges with ink in them.
- The printer then must be connected to a network that is also connected to the local computer. This could be a wireless connection, network connection (via an ethernet cable), or a direct connection (via a USB cable).
- Next, the local computer must have the proper drivers and installation registry records to recongnize the printer in its proper location
- The local computer must then have a recognized port to transit the printer information to the Remote Desktop. Windows RDP has a native application with its connection, but you can also use third-party products such as TSprint or ThinPrint.
- The Remote Desktop then needs to recognize the transmission port and report the printer in its registry records
- Finally, the software responsible for creating the document, whether a word processing like Microsoft Word or a Information Management System like Sage 300 or Filemaker, must be able to see the list of printers on the remote desktop to print.
When troubleshooting a printer that does not want to print, the potential culprit could be virtually anywhere along this logical path. Each step has multiple ways it could break down, and it is also possible that there could be more than one problem causing the printers malfunction. This step by step instruction assumes the worst, as each step could reveal the problem and it could be fixed then and there.
Step 0: Search the Error
Before you dive head first into any issue, if the problem provides an error message, search on the internet for it. Sometimes this has already been resolved and the technical wheel does not need to be re-invented.
Step 1: Duplicate the Problem
The first thing a tech needs to do is to manufacture the same problem in a way that they can see what is going on. Some of the hardest problems are ones that happen intermittedly when the tech cannot see or locate a pattern. Sometimes the tech cannot find the problem becuase they are attempting to duplicate the problem using different hardware / software. Sometimes this can help identify the problem faster but troubleshooting is a logical process. Doing things out of turn can also create a lot fo confusion and wasted time.
Step 2: Isolate the Problem
Regardless of whether we know what the problem is, we can figure out exactly where on the path the problem is originating from, this can be done in two different ways
Start at the End and prove what works.
OR
Start at the Beginning and prove what doesn’t work.
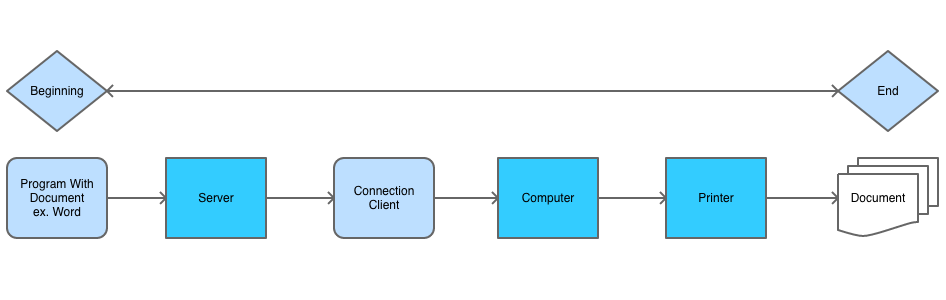
Start at the End: You’ll want to work with each piece to see if it functions properly. In the example of the printer. I would first check to see if the printer is on and functioning with no error messages. Then I go to the local computer and attempt to print a test page directly from printer preferences, then print a page from an additional piece of software. From there I would go onto the Remote Desktop and print from a different program, or I would see if someone else from the office can print properly on their account. if Everything works except for the specific case that it was printed, then chances are the problem lies right at the Beginning.
Start at the Beginning: If printing from Sage300 does not work, can you printer from Microsoft Word on the server? Can someone else print from Sage 300? Can you recongnize the printers in the Remote Desktop account. If not, then test the local computer, if that does not work, then test the printer.
Both strategies have merit. Personally I will start at the beginning and move very fast towards the beginning testing things until something works, then I’ll start there and work my way back to the end. Either way, the goal is to isolate a single process that is not working. This get complicated if two or more processes are malfunctioning, but more on that later.
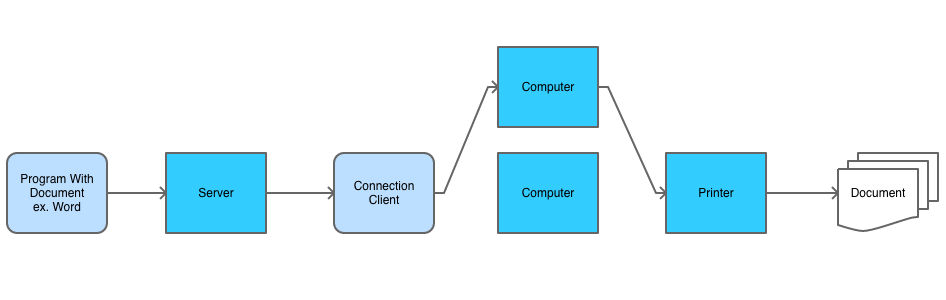
Step 3: Replace To Prove Problem
If there is a single process that is potentially causing the problem, replace it to see if it fixes the problem. This could be someone else printing from sage to the same printer on the same local computer, this would indicate that something is wrong with the specific Remote Desktop account. Or if the problem user can print fine using their remote desktop account on a different local computer to the same printer, then the problem must be with the local computer.
Step 4: Work Around / Fix / Clean / Replace
Now that the problem is isolated, it is finally time to figure out exactly what the problem is. In some cases, the entire process that we just followed will have to be performed again, but on a smaller scale. If the local computer will not detect the printer, it could still be many different things like a firewall/anti-virus issue, network connectivity, physically broken USB/network port on computer, computer updates, driver updates, and on and on. The better knowledge a tech support has the faster they can get through this process.
At some point the value of the tech supports times will begin to out-weigh the prospects of finding out exactly what went wrong. There are five final solutions that can finish the ticket
Work Around: Work Arounds (Also known as Band-Aids) are used in urgent situations when the user is willing to settle for not knowing what went wrong to get operational again. The final state is not as good quality as the original state, but there is a lack of resources, motivation, or time to find the real problem. Plugging in the printer via USB instead of the network would be a Word Around.
Fix: A fix is a mostly permanent solution to the problem (I say mostly becuase nothing stays permanent in this industry). The actual problem was diagnosed and properly dealt with. The problem should not come back unless something changes that is out of control of the Techs, or that there is a deeper issue that will need to be diagnosed again later.
Clean: Sometimes the issue cannot be directly found, but doing a broader change will undoubedtly resolve the issue. Resetting or Reinstalling Windows is a great example of this. Either way the problem can be resolved by starting fresh with new or reset settings.
Replace: At some point, it does not become worthwhile breaking apart a $150 printer to clean the header, repair a faulty spool, and get a paper jam out of the farthest void of the printer, when a new printer could be purchased. Maybe it might be best to buy a better quality printer that will last longer and has extended support from professionals to prevent it from going into the waste basket.
Conclusion
This may only be one simple example of getting a piece of technology to work, but the concept is the same throughout almost all of tech support. Understand the process, eliminate stuff that is working, narrow down the problem, fix it, then test. Rinse and repeat until thing everything is back to working order. Think you are up for the challenge next time something goes wrong? I hope this Episode has helped.
Check Out Episode 1: Tech Support Etiquette