
Microsoft Teams no longer a hassle
Earlier on in Microsoft Teams development, they made it very difficult to use Teams for a typical conference app for friends and family. It was locked down for use only through Teams accounts of the same organization. Thankfully, those barriers are coming down for most users. Microsoft has been slowly removing barriers for guest access with the most recent announcement of guest access will be by default ON for all users starting February 8th, 2021. This is great news for all businesses that don’t have IT staff that can pour through all the complicated settings to make it happen.
This article is to provide instructions and tips for using your Teams account to set up a successful Public Teams meeting. This article does not provide instructions on enabled guest access in the administrative console.
First, for the person creating the meeting:
Access your Microsoft Teams Account, this can be done through the browser, or through a desktop app. My screenshots are taken through using the Mac Version and using Dark Mode.

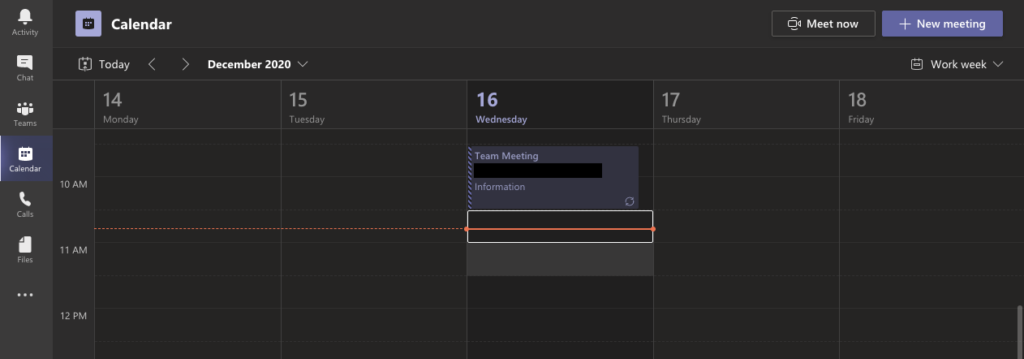
You’ll want to go to your Calendar Section of your teams account. This does not need to be done in any specific channel. Next, you’ll want to choose a time for your meeting. I’m going to select 11:00am. Double Click on the time Slot.
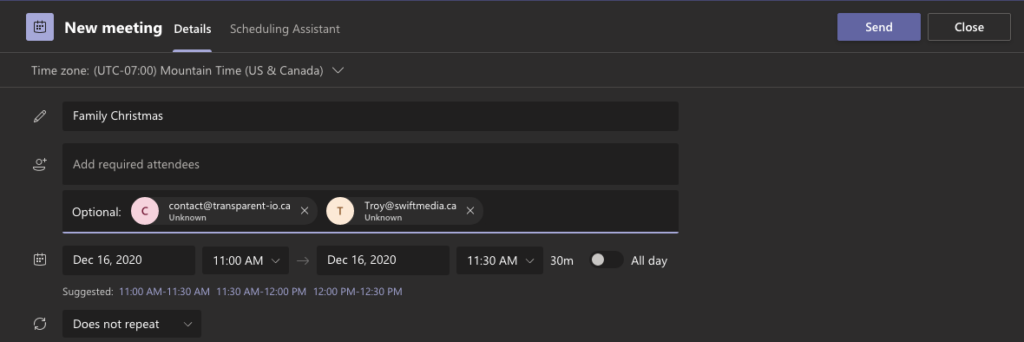
Fill out your information. Most of the details in this section are not very important. The only fields you really need are the Title, and the Attendees.
In the Add required attendees field. I like to click the “+ Optional” button to add optional attendees instead. This prevents the meeting from being canceled or rescheduled by invitees.
Add in the email address of all your guests. Once done, thats it! Just click Send. Everyone will receive an email invite them to the Party.
Meeting Time
As the Meeting creator, you will still want to join the meeting inside of your Teams instance. Head back to the calendar and you’ll see a “Join” Button on your event. Make sure to join the meeting a few minutes ahead of schedule so that you can allow people into the meeting when they arrive.

On the next screen, select your audio and video settings. Each slider decides if you want to use certain features like video, audio, and a background. The cog pops up a window that lets you select you input/output devices (handy if you have an external webcam, microphone, or speakers you want to use.) Once ready, his Join Now
For Everyone Else
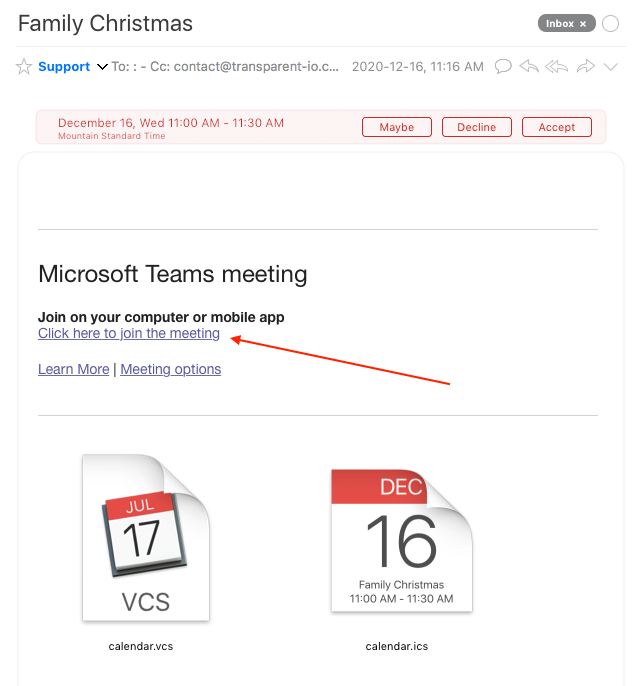
All of your guest will receive an email that looks roughly like this. The only thing they need from the email is the Click here to join the meeting hyperlink. Click that link to join.
TIP: I have many Microsoft profiles on my computer, and so loading this link normally will cause problems as Microsoft will try to force me to log into an account. If the account I log into is not associated with the email that the link was sent to, it will cause conflicts. To avoid this, I always right click the link, copy it. Then paste it into an incognito/private browser. This way I start fresh every time and there is no conflicts with any of my other accounts.
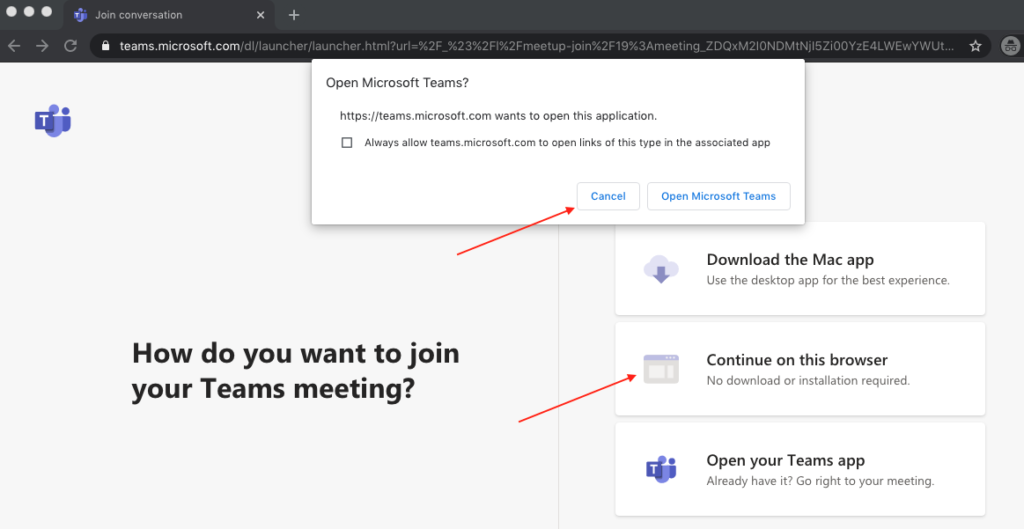
That browser window that comes up will present you with some options. The first may be a pop-up asking you to open the Teams Application. Teams will try to get people to download the app, but it is unnecessary. Hit Cancel on the pop-up. Then on the screen behind it. Click on “Continue on this browser”
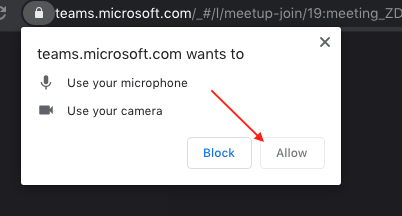
Microsoft Teams will then load on the browser. The next screen will check if Teams has permission to access your microphone and camera. Make sure to not skip this pop-up and hit allow. If you lose the pop-up and cannot find it. You may need to quit out of your browser and try loading it again from the start.
Choose your settings, and hit join now. Thats all there is for the guest to do.
One Final Step
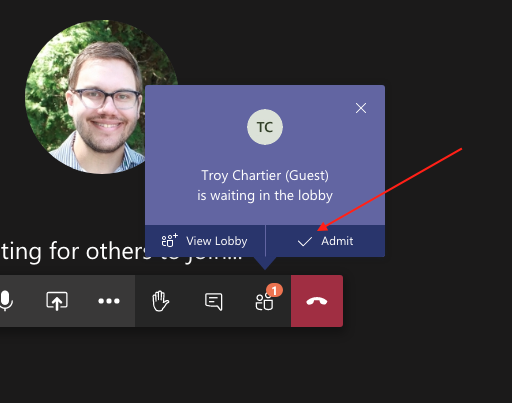
Lastly, the meeting host will have to allow the guest into the meeting. A pop-up will appear stating that someone has entered the lobby. Click on Admit to allow them into the meeting.
And thats it! Enjoy your public meeting!
P.S. General Tips for a good group conference
- Try to keep your microphone muted as much as possible when not speaking. This prevents disruptions during talking as the system attempts to compensate by suppressing microphones and may accidentally mute the true speaker.
- Try to wear headphones as much as possible. This reduces echo in other people’s audio. Echo is not caused by the speaker, but by someones else’s microphone causing a feedback.
- If headphones are not possible (using a distanced TV, multiple people). Try to keep the output (speakers) pointed towards the users and in front of/ away from the microphone.
- Always plug into a LAN network if possible instead of using Wi-Fi, it will keep the stream more consistent
- If plugging in is not possible. turn your camera off to improve your audio quality.